INFRARED LAMP SAUNA PLANS
Updated 1/26/19
The red heat lamp
sauna consists of two sections:
1. An
electrical heating unit. This
consists of three red ‘heat lamps’ fro the hardware store mounted
on a piece of wood or other material.
You will then place this unit inside an enclosure.
2. The sauna
enclosure can be of different types.
These plans include one made of a frame that one covers with fabric,
canvas or blankets. However, the
enclosure can be a bathtub area, a tiny bathroom, or small closet. Plans for a frame enclosure follow the plans for the electrical unit.
1. ELECTRICAL HEATING UNIT PLANS
Materials
·
Three or four 250-watt, reddish ‘heat
bulbs’ or ‘heat lamps’. These are sold at many hardware stores and cost between about
$8. To $15. US dollars each.
Standard
brands of these lamps include Philips, General Electric, Sylvania, Havel-Sli,
Feat, Westinghouse and others.
They are all okay. We
prefer ones with brass screw bases, which most of them have. Some companies may coat their lamps
with Teflon, which reduces the danger of breakage, but the lamps could outgas
somewhat when heated. This is not
too bad, however. Just leave them
on for a few hours when you buy them and they should outgas and not be a
problem. Do not use clear heat lamps. Their frequency spectrum is not correct
for development.
·
Three or four ceramic or plastic
lamp sockets designed for 250-watt bulbs. Sockets are available that wire from
the front or from the back. Another type of socket unscrews so that one places half the
socket behind a thin piece of wood or metal.
·
Fifteen feet of heavy lamp cord. We like to use a standard
15-foot extension cord because it comes with a male plug attached. We then simply cut off the female plug
on the extension cord. The cord
need not be grounded.
·
A switch or timer-switch capable of
handling seven amps (for three light bulbs) or about 11 amps if you will use
four lamps. You may use a standard wall switch with a box and switch
cover plate. Other types of
switches are rocker, push button or toggle switches. You may also use a mechanical or electronic timer-switch,
although they cost about $20-50.00 more.
Do not use a dimmer switch as they
often emit strong electromagnetic fields.
·
A piece of hardware cloth or welded
wire mesh about 15" by 31". This will be bent around the lamps as a
guard to prevent anything from touching them. The openings of the hardware cloth or wire mesh should be
¼ to ½ inch.
·
Four wood screws and four 3/16"
x 1" fender washers. These are to fasten the lamp guard to
the board or enclosure. You could
also use a staple gun to secure the guard to the wood.
·
The board to mount the sockets on should be about 12” high and 24” wide. The extra width is to mount the switch
to one side of the lamps.
The board
can be of solid wood, masonite,
veneer or plywood. If you decide
to use 2-piece sockets that mount through a hole in the board, you must use a
thin board such as veneer or masonite.
For chemically sensitive people, one could use sheet metal or hard plastic
like Lucite if one is not sensitive to this material. To avoid all outgassing, use a metallic material or a poplar, oak or fir shelf board.
To hide the wiring, you can install
a second thin board behind the main board. This is nice, but not necessary.
· 2 wood screws or machine screws and nuts for mounting the switch to a board
or enclosure. Hardware to mount the sockets to the
board are not necessary if your use two-piece sockets
and a thin board. Six wood screws or
machine screws and nuts are needed to attach three sockets to the board if you
use a solid wood board and sockets that simply screw to the board.
Tools
required include a screwdriver, wire cutters, and a drill to cut holes in the
board for wires, sockets and mounting screws.
Construction
Warning #1. Disclaimer. Use extreme care when assembling, wiring and using any electrical
device of your own design. The
author cannot be responsible for misuse of a sauna, poor construction
techniques or improper wiring that can cause fires, shocks or other accidents.
Always unplug the unit from the wall
before changing any bulbs.
Accidents
happen in saunas. Always move
slowly and carefully near a sauna.
Never allow young children to play in or use a sauna unaccompanied.
Warning #2:
Please do not alter this design if you want safety and the best results. Many people create their own sauna with
lamps in the corners, or on several sides, or on the ceiling. These are not acceptable designs for
various reasons: Bulbs on the
ceiling are dangerous if they shine on your head. More than four bulbs is too
much. The reason for putting all
the bulbs on one panel is that there is less chance of turning around in the
sauna and bumping into them.
The only possible
modifications I suggest is that you may design the unit:
1) You can use
four bulbs instead of three, with the fourth lamp near your knees or even
feet. This will heat up faster and
provide more infrared. It is
necessary if your enclosure is larger.
2) You can design
the unit so you can lie down inside, instead of sitting. This is necessary for people who are
disabled or weak and cannot sit for the half hour needed for a sauna
session. The book, Sauna Therapy,
contains details for modifying the design for laying down in the sauna. However, sitting is better, in our
view, if sitting is possible.
3) A few people
don’t use a board. They buy three
clamp-on sockets. These have light
sockets on one end and have a large clamp on the other end. Photographers use them.
One clamps the sockets to a 2 x 4 piece of wood. Instead of a switch, one plugs all three clamp-on sockets
into a power strip that has a switch on it. This arrangement can work if you can secure the clamp-on
sockets so they don’t move, which is not easy. It is not safe if they can move around! Also, you may still need a guard
covering the light bulbs to prevent accidentally touching them.
To Begin Construction Of
The Basic Unit
Mount the sockets
to the board or enclosure in a triangle shape (see the diagram at the end of
this section). If you are using a
board that is 12” high by 24” wide, the top socket is placed in the center, 2”
from the top of the board. The
lower sockets are mounted two inches from the bottom of the board and 9 to 10”
apart.
Place the switch
or timer-switch as far away from the lamps as possible, either to one side or
above them.
Wiring. Wire the sockets in parallel. (See diagram below.) The lamps will not work properly if the
sockets are wired in series. When
wiring the sockets, one need not cut the lamp cord.
It may be faster to connect two wires to one socket and then run the cord
to the next socket. Separate the
wires at the next socket, strip the wires just where the terminal screws are
and screw down the terminals over the wires. Then continue similarly to the third socket.
Run the wires to the switch.
The switch should be on the “hot” or black wire for maximum safety.
For the
protective guard in front of the lamps, bend the hardware cloth into a C shape
with 1" flanges at each end.
It is easiest to bend it over a sharp edge of a table or desk. Make the bends in the 31” length, so
the 15” dimension of the hardware cloth becomes the width of the guard.
First bend the 31"
piece of mesh 90° at 1". Make
another 90° bend at 9", another at 22" and another at 30". Make all bends in the same
direction. This should form a C
shape with 1" flanges at each end for fastening to the wood with wood
screws and large washers, two on the bottom and two on top.
To mount the
board in an enclosure, you may drill holes in the corners for screws. If you will mount the electrical unit
on a PVC pipe frame, you will need mounting holes for four 3/4” pipe straps. Click here to view a wiring diagram of the electrical unit
or view it below:

Mounting and Ventilation. If
one’s unit is for a bathroom or closet, secure it to a wall so it will not fall
over if accidentally bumped. In a bathroom tub area, the unit can be hung
from the shower pipe. However, also tie it back so it will not move.
If you will mount it in
a wooden or other enclosure, you can secure it using four wood screws, one in
each corner. To mount to a PVC pipe frame, use four pipe straps.
Ventilation can be
important. Most bathrooms have ventilation. In a closet, the door
may not fit tightly at the top. If necessary, open the door slightly
every 10 minutes or so as needed to provide ventilation. If building an
enclosure, leave a 1" wide opening across the top at the front and back.
Cautions and
Disclaimer
Always unplug the unit from the wall before changing any bulbs. Observe all cautions as with
any electrical appliance exposed to heat and moisture. Do not touch the lamps during use, or let
water, sweat, towels or anything touch them. I will repeat, accidents
can happen in saunas. Always move slowly and carefully. Never allow
young children to play in or use a sauna unaccompanied. The author cannot
be responsible for misuse of a sauna or poor construction.
2. SAUNA FRAME ENCLOSURE PLANS
The
electrical heat unit described above may be mounted in any suitable enclosure
including a small closet, wooden box, frame enclosure or other space. If the space
is larger than about 4' by 4' and 5'- 6' high, it will likely need an auxiliary
heater or another heat lamp to bring the sauna to 110° F. within 20-30 minutes. For much more information
about enclosures, see Chapter 12 of the book, Sauna Therapy
An excellent inexpensive enclosure
suitable for apartments and portable use consists of a frame over which one
places blankets, a cloth drop cloth or other fabric. It works well,
though it may be a bit delicate and requires care in its use. The frame
parts cost less than $50.00.
The sauna enclosure plans below call
for bending the PVC pipe. Another
design is just to build a rectangular box out of PVC pipe. This is actually more stable and we may
switch to that design, although either one works.
Materials for the bent frame unit. The
frame requires five 10-foot sticks of either:
- 3/4” PVC water pipe OR
- the thicker
(SCH 40, 480 PSI) 1-inch PVC water pipe.
Either size will work fine.
Also required are four PVC T-connectors
and eight PVC elbows of the same size as your PVC pipe (either 1” or
¾”).
You will also need four pipe clamps
(either ¾” or 1”) and eight machine screws and nuts to fasten the clamps
to the lamp unit. PVC cement is not needed.
If you are
chemically sensitive and are concerned about using PVC pipe, you could build
the frame of some other material.
For example, building supply stores sell long pieces of L-shaped, thin
steel used for stucco walls. It is inexpensive and already has holes in
it along its length. It can be cut with tin snips and could be used to
make a metal frame. Wood, such as pieces of 2”x 2” or 2” x 4”, could also
be used for the frame members.
Tools required
are a hack saw or pipe cutter to cut PVC pipe, tape measure and a rubber hammer
to tap pieces together if they are stiff. No PVC glue is needed.
The
enclosure is designed to be connected to an electrical
unit that contains the lamps with guards over them for safety and with all
safety requirements needed for any home appliance or piece of equipment.
One forces the PVC frame to narrow where it connects to the board. It
will flare out and become wider as one moves away from the board. The
design shown is five feet high, high enough for most people.
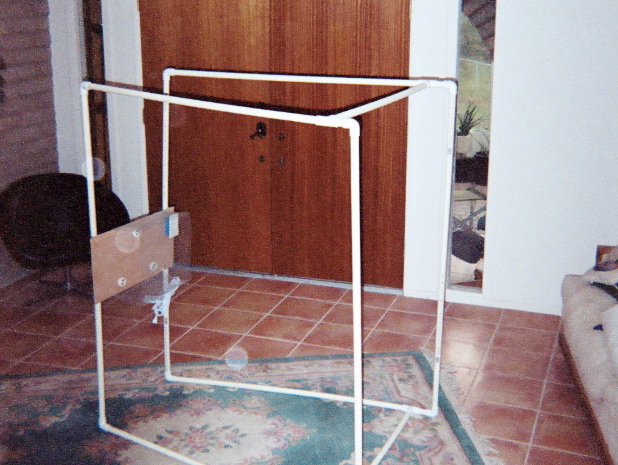
PVC Pipe Enclosure Assembly. Cut
the PVC pipe into four 5-foot sections, six 4-foot sections and four 3-inch
sections. Assemble as shown. Push pipe sections into the connectors
and use a rubber hammer to gently tap the pipe firmly into the
connectors. Assembling the unit on a hard floor will help, as one can
place the pipe on the floor when tapping them with a hammer. No cement
should be necessary unless pipe is very loose in the connectors. The
order of assembly of the sections does not matter. Click here to
view a diagram of the sauna frame.
Secure a
board about 24 inches wide containing the lamp sockets to the PVC frame with
four 1-inch pipe clamps. The frame will bend to accommodate the size of
the board. In fact, this adds rigidity to the structure. The lamp
height will be adjustable by moving the board up or down along the vertical PVC
pipe sections. The upper lamp should be at chest height when sitting, and
the lower lamps at abdomen height.
3. COVERING THE
FRAME. You may cover the frame with two queen or king-size
blankets, fabric such as fleece, flannel or velour, quilts, comforters or
canvas. A canvas painter's drop cloth that is 14’ x 24’ is sold at Home
Depot and works beautifully as long as the width of the frame is reduced to
three-foot wide instead of 4-foot wide.
To fasten
fabric or blankets to the frame, an excellent way is to buy large (2”) paper
clasps, sometimes called butterfly clips, at an office supply store.
These work very well. One could also use large safety pins or clothespins
to hold the blankets or fabric in place.
It is important that the door area closes tightly. It can consist of a flap of canvas or
other material, or a curtain made of fabric. Clips or clothespins can hold it closed, if needed.
Final steps:
4. AN OUTDOOR
THERMOMETER THAT READS UP TO 120 DEGREES F. This can be a standard, inexpensive outdoor thermometer sold
in hardware stores. It is
important to have to make sure your sauna is at the right temperature, which is
between 110 and 120 degrees F.
Attach the thermometer to the frame at about eye level when sitting down
(about 3-4 feet off the ground).
If the sauna is well-insulated, it
should not take more than about 15 minutes to heat to 110 degrees F. when the
sauna is placed in a room at standard room temperature. If you will place the sauna in a cold
garage or other cold room, it needs to be insulated better in order to heat up
properly.
5. TOWELS IN THE
ENCLOSURE.
This enclosure design does not have a
floor. Instead, just place a few towels
under the stool where you will sit.
The sauna is dry, so it will not make a mess. However, sweat will drip do it is wise to cover the floor.
6. A STOOL TO SIT ON.
You will also need a small
stool or chair without a back to sit on. A shower stool works well. The stool or chair may be of metal,
wood or plastic, and could even be painted. The bottom part of the sauna
does not get too hot, so outgassing is usually not a
problem. A fancy stool that
rotates is nice, but not necessary.
Warnings: Be sure to have a
guard in front of the lamps to protect the bather from touching the hot
lamps. Also, be sure that all
fabric or blankets are 12 inches or more from the heat lamps to avoid a fire
hazard. Pull blankets or fabric tight near the lamps so they do not hang
loosely near the lamps. Avoid leaving the lamps on when no one is
present, except to pre-heat the sauna.
With your electrical heat
unit, frame enclosure and a stool to sit on, you are ready to use your
sauna. You can pre-heat it for 10
or 15 minutes, or you can enter it when it is cold and you will warm up with
the sauna.
Wear a bathing suit or
less, so the light strikes your skin.
For women, a two-piece bathing suit is better than a one-piece suit.
Rotate your body 90 degrees every 2-5 minutes or so to let the
infrared penetrate the body evenly.
We do not recommend staring at the lamps. (Wear sunglasses if you are very sensitive to the
light.) Wipe off sweat with a
small towel.
Please never stay in a
sauna more than 20 minutes, at first, and extend the time in the sauna up to 50
minutes or so only as you begin to sweat, which can take days or weeks to
occur. Leave the sauna immediately
if you feel very weak, if your heart starts racing, or if your face turns very
red.
Home | Hair Analysis | Saunas | Books | Articles | Detox
Protocols